> ## Documentation Index
> Fetch the complete documentation index at: https://sudomock.com/docs/llms.txt
> Use this file to discover all available pages before exploring further.
> ## Agent Instructions
> The base URL is https://api.sudomock.com.
> Authenticate every request with the x-api-key header. Keys begin with sm_.
> A render returns the finished image at data.print_files[0].export_path. A request sent with is_async true returns a job_id to poll at GET /api/v1/jobs/{job_id}.
> Prefer the official SDKs over hand-written HTTP calls: npm install sudomock for Node, pip install sudomock for Python.
# Set up the editor your buyers see
> Branding and controls for the embedded editor.
Studio is the editor you put in your own product, so a shopper personalises a
mockup without leaving your storefront. This page is where its look and its
limits are decided, and where you open a live session to check the result
before a customer meets it.
## Studio settings
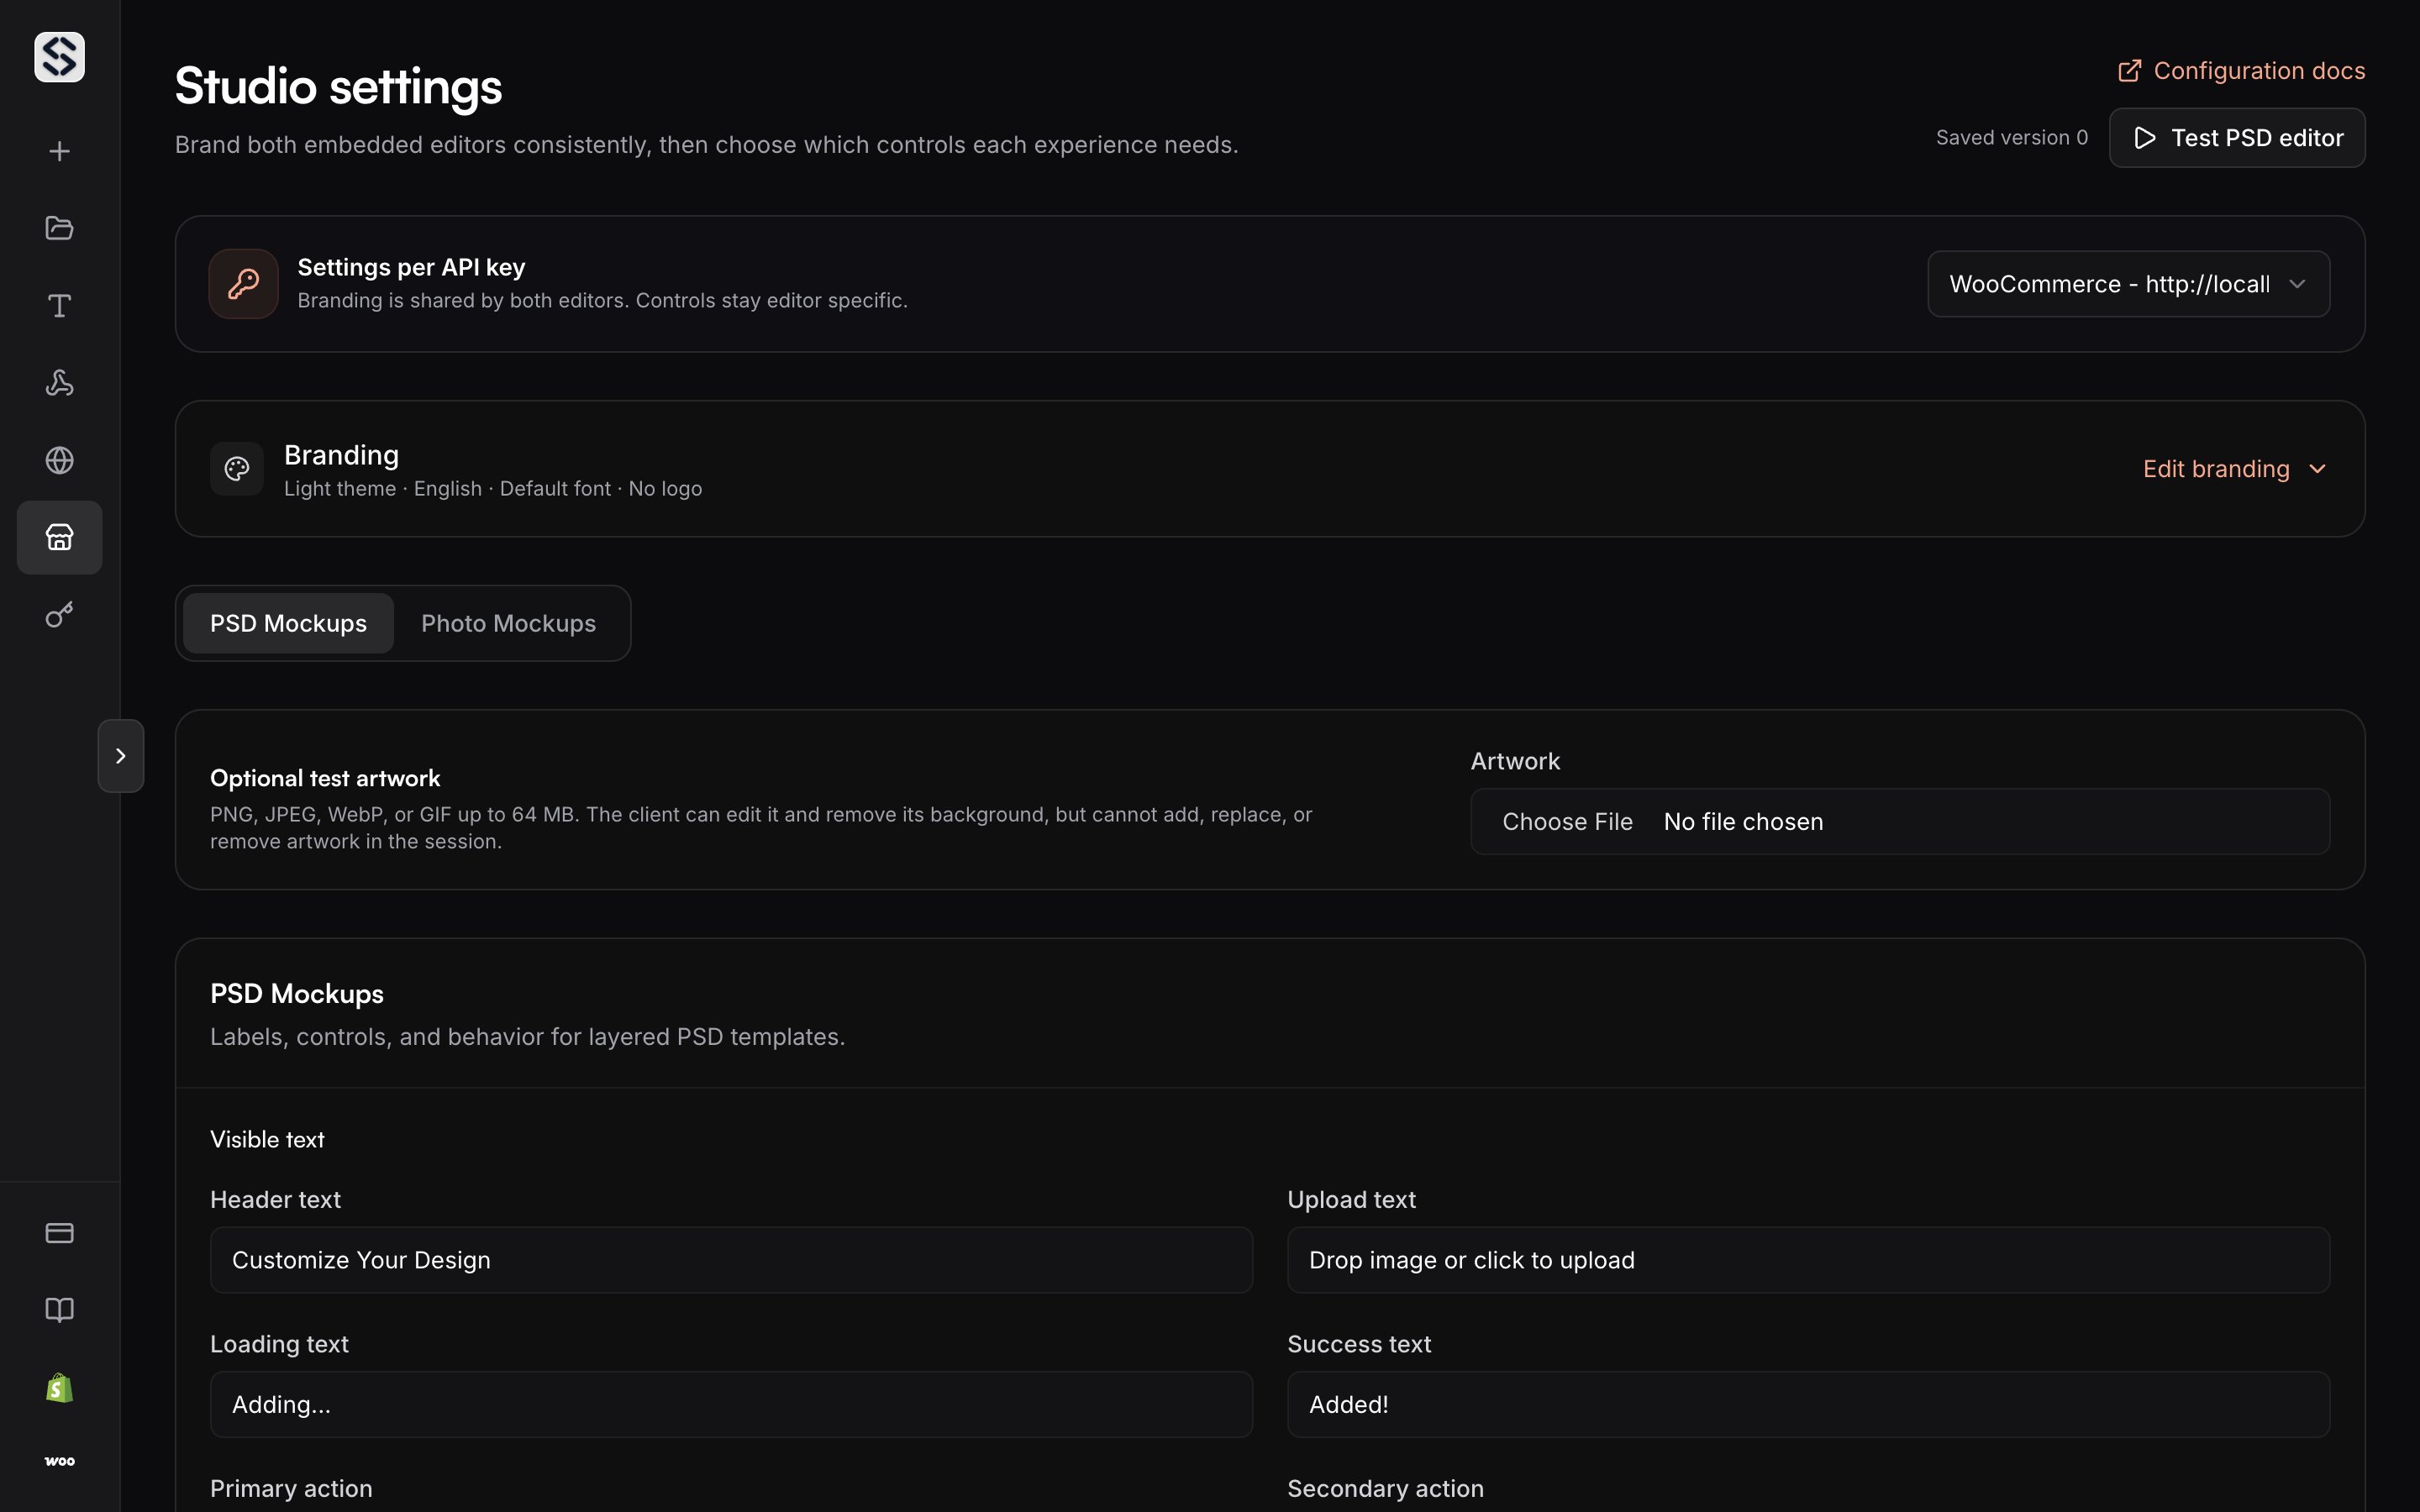
Studio opens on the settings for one API key, and everything on the page is
saved against that key: the branding a shopper sees, the controls each editor
offers, the words on the buttons, and the ceiling on what can be uploaded.
Saving here does not open a session for a customer. Your server opens one when
a shopper arrives, and it starts from whatever was saved last.
The same settings are readable and writable over HTTP. [Retrieve the Studio
config](/docs/api-reference/studio/retrieve-the-studio-config) returns the effective
configuration for the key that made the call, and [Update the Studio
config](/docs/api-reference/studio/update-the-studio-config) replaces it. The write
carries a `config_version`, so two people editing the same key find out about
each other instead of quietly overwriting.
Studio is a paid-plan surface. An account on trial credits does not see this
page.
## Choose the key the settings belong to
Each API key keeps its own Studio settings, so one account can dress the editor
differently for two storefronts. Pick the key at the top of the page and
everything below applies to sessions created with it.
An account with no key yet is asked to create one first. Settings cannot exist
before the key they belong to, and [API keys](/docs/dashboard/api-keys) covers
issuing one.
## Brand both editors
The logo, the accent colour, the neutral palette, the corner radius and the
choice between a light and a dark theme are shared by both editors, the PSD one
and the photo one, so a buyer moving between them does not see two different
products. A logo is served over HTTPS, and leaving it empty hides it rather
than showing a placeholder. Leaving the font empty uses the default.
Changing the preset resets the neutral palette, so choose the preset first and
tune the colours after.
 ## Choose which controls a customer sees
Controls are set per editor, because the two editors do not offer the same
work. Switching one off takes it out of every session created with that key,
which is how you keep a shopper inside the decisions you are willing to fulfil.
* The PSD editor offers adjustments, colour overlay, text layers, fit mode,
position, size, rotation, flip, export options, zoom, and undo and redo.
* The photo editor offers artwork, fill, blend, opacity, transform, zoom,
export, and background removal.
* The palette a shopper picks colours from is shared by both, and so is the
maximum upload size, which runs from 1 to 50 MB.
The PSD editor can also redraw its preview on its own once an edit settles.
Keep the delay short and the preview chases every nudge; stretch it and the
shopper waits. Switch the automatic redraw off and the preview is redrawn only
when asked for.
## Write the words a customer reads
Every label in the editor is yours: the header, the upload prompt, the two
action buttons, and the two short lines a shopper reads while a render settles
and after it lands. The primary action is named per editor and per session
kind, because a merchant saving a template and a shopper adding one to a cart
are not making the same promise, and one button label cannot cover both.
The editor language decides what the rest of the interface says. Two are
available, `en` and `tr`.
## Understand a Studio session
A session is one visit to the editor. Your server opens it and hands the
browser a short lived token, and three fields decide the shape of that visit.
* `mockup_type` picks the editor, `psd` or `2d`.
* `session_kind` picks the job, `setup` for a merchant preparing and saving a
mockup, `customize` for a shopper working with one that is ready.
* `allowed_origin` names the page that is allowed to host the editor.
When the visit ends, the editor reports what came of it and your server
confirms that report against the render it refers to. There are two reports:
`studio.mockup-saved` for a template a merchant saved, and
`studio.design-submitted` for a design handed back to your checkout. Confirming
the same one twice returns the original receipt instead of a second result, so
a retry after a timeout is safe. [Create a new Studio
session](/docs/api-reference/studio/create-a-new-studio-session) and [Consume a
Studio action](/docs/api-reference/studio/consume-a-studio-action) carry the fields.
Create sessions on your server, not in the browser. The session call carries
the API key, and a key in client-side code is a key you have published.
## Test before you embed
A live session runs against the saved settings for the selected key, with
optional test artwork and a mockup you own, so you see the real editor rather
than a preview of it. Open one after every branding change. A logo that does
not load and a palette that swallows a button both look fine in a settings
form and obvious in the editor itself.
A storefront on Shopify or WooCommerce reaches the same editor through the
official [app](/docs/integrations/shopify) and [plugin](/docs/integrations/woocommerce),
which open the session and place the button for you.
## API reference
Every field on this page has a name in the contract, and every Studio call
takes the key in the `x-api-key` header. For the whole group, see the Studio
endpoints starting at [Retrieve the Studio
config](/docs/api-reference/studio/retrieve-the-studio-config).
[Authentication](/docs/authentication) covers why the key stays on your side and
what a rejected key answers.
## Choose which controls a customer sees
Controls are set per editor, because the two editors do not offer the same
work. Switching one off takes it out of every session created with that key,
which is how you keep a shopper inside the decisions you are willing to fulfil.
* The PSD editor offers adjustments, colour overlay, text layers, fit mode,
position, size, rotation, flip, export options, zoom, and undo and redo.
* The photo editor offers artwork, fill, blend, opacity, transform, zoom,
export, and background removal.
* The palette a shopper picks colours from is shared by both, and so is the
maximum upload size, which runs from 1 to 50 MB.
The PSD editor can also redraw its preview on its own once an edit settles.
Keep the delay short and the preview chases every nudge; stretch it and the
shopper waits. Switch the automatic redraw off and the preview is redrawn only
when asked for.
## Write the words a customer reads
Every label in the editor is yours: the header, the upload prompt, the two
action buttons, and the two short lines a shopper reads while a render settles
and after it lands. The primary action is named per editor and per session
kind, because a merchant saving a template and a shopper adding one to a cart
are not making the same promise, and one button label cannot cover both.
The editor language decides what the rest of the interface says. Two are
available, `en` and `tr`.
## Understand a Studio session
A session is one visit to the editor. Your server opens it and hands the
browser a short lived token, and three fields decide the shape of that visit.
* `mockup_type` picks the editor, `psd` or `2d`.
* `session_kind` picks the job, `setup` for a merchant preparing and saving a
mockup, `customize` for a shopper working with one that is ready.
* `allowed_origin` names the page that is allowed to host the editor.
When the visit ends, the editor reports what came of it and your server
confirms that report against the render it refers to. There are two reports:
`studio.mockup-saved` for a template a merchant saved, and
`studio.design-submitted` for a design handed back to your checkout. Confirming
the same one twice returns the original receipt instead of a second result, so
a retry after a timeout is safe. [Create a new Studio
session](/docs/api-reference/studio/create-a-new-studio-session) and [Consume a
Studio action](/docs/api-reference/studio/consume-a-studio-action) carry the fields.
Create sessions on your server, not in the browser. The session call carries
the API key, and a key in client-side code is a key you have published.
## Test before you embed
A live session runs against the saved settings for the selected key, with
optional test artwork and a mockup you own, so you see the real editor rather
than a preview of it. Open one after every branding change. A logo that does
not load and a palette that swallows a button both look fine in a settings
form and obvious in the editor itself.
A storefront on Shopify or WooCommerce reaches the same editor through the
official [app](/docs/integrations/shopify) and [plugin](/docs/integrations/woocommerce),
which open the session and place the button for you.
## API reference
Every field on this page has a name in the contract, and every Studio call
takes the key in the `x-api-key` header. For the whole group, see the Studio
endpoints starting at [Retrieve the Studio
config](/docs/api-reference/studio/retrieve-the-studio-config).
[Authentication](/docs/authentication) covers why the key stays on your side and
what a rejected key answers.