Understanding Mockup API Data Models: A Technical Guide
Deep dive into mockup API response structures. Learn how smart object data is organized, what each field means, and how to build robust integrations.
TL;DR
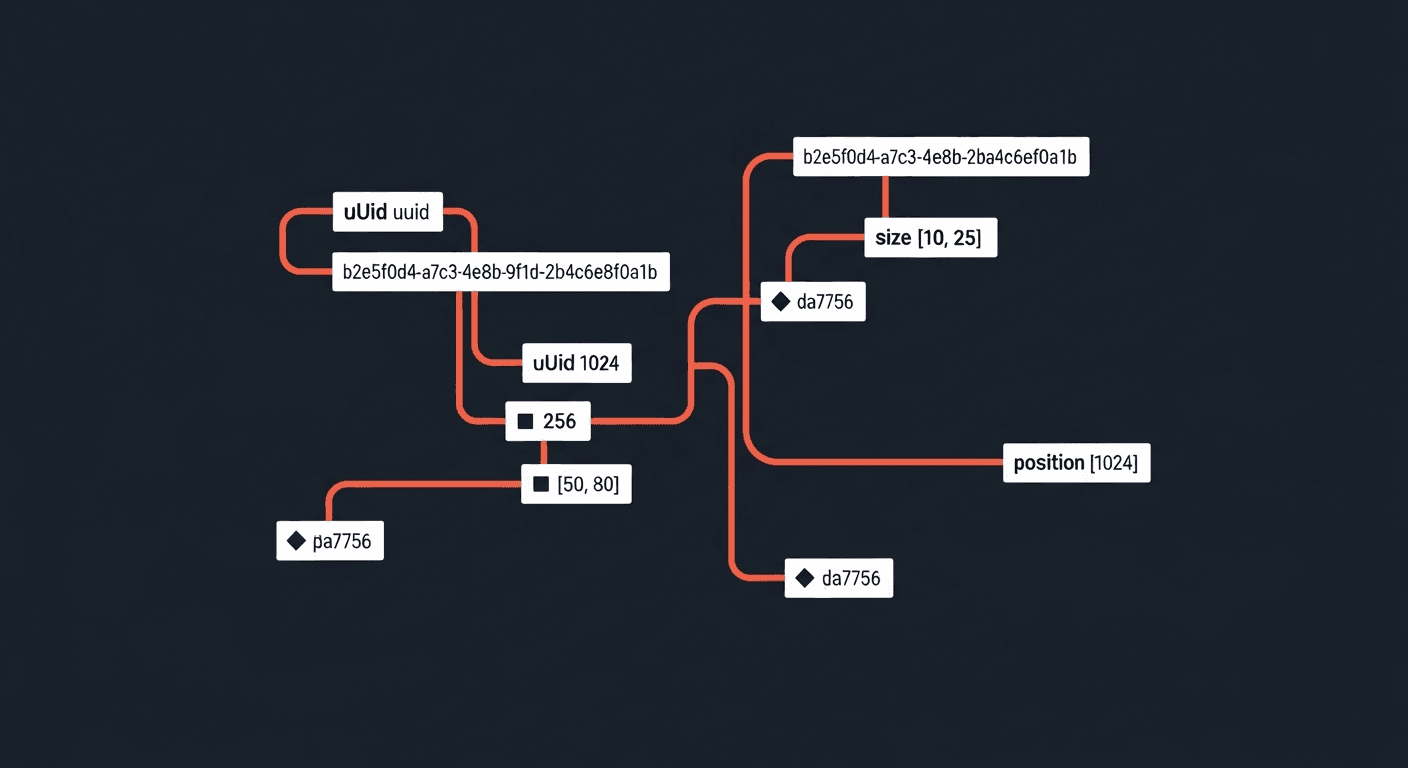
Understand the API response structure: uuid for identification, size for design resolution, position for canvas placement, and quad for transformed corners. Build robust integrations by understanding these data models.
Key Takeaways:
- •size = embedded Smart Object dimensions (design at this resolution)
- •position = where it renders on the mockup canvas
- •quad = corner coordinates for warped/transformed objects
- •uuid = unique identifier for API calls
Understanding how mockup APIs structure their data is crucial for building robust integrations. This guide covers the de-facto standard data model used across the industry, what each field means, and how to use them effectively in your code.
The De-Facto Standard: Rect + Transform
Every major design tool and mockup API uses the same fundamental data model: a rectangle with position coordinates and optional transforms. This pattern comes from decades of graphics programming, from Photoshop to Canvas2D to WebGL.
This model is universal because it's deterministic, minimal, and fast. Whether you're working with Photoshop layers, Figma frames, or mockup APIs, the core concept remains the same: define a bounding box and optionally transform it.
Anatomy of a Smart Object Response
When you upload a PSD to SudoMock, each smart object layer returns detailed metadata. Let's break down what each field means and how to use it:
1
Understanding Each Field
size vs position: The Key Distinction
The most important concept to understand is the difference between size and position.
They represent two different things:
Think of it this way
size = "Upload your design at this resolution, send coordinates in render API"
position = "Use this for drawing previews on thumbnail images in browser"
In the example above, a 3951x4800 design gets scaled down to 507x620 when rendered on the mockup canvas. The scale factor is approximately 0.128x (507/3951).
Working with Quad Coordinates
The quad array contains four [x, y] coordinate pairs representing the corners
of the smart object's bounding box. This is especially useful for:
1
Integration Patterns
Pattern 1: Basic Render Request
The most common pattern is uploading a PSD, storing the smart object metadata, then using it to render variations:
1
Pattern 2: Using Position Data for Custom Rendering
If you're building a custom preview or need to render locally, the position data tells you exactly where to place the design:
1
Design Resolution
For best quality, prepare your design at the size dimensions (e.g., 3951x4800),
not the position dimensions. The API handles scaling automatically.
Working with Blend Modes
The blend_mode field indicates how the smart object layer blends with
layers below it in the PSD. Common modes include:
For color smart objects (used to change product colors), MULTIPLY is
typically used so the design texture shows through the color overlay — common in drinkware mockups and apparel templates.
Next.js Integration Examples
Here are practical examples for integrating SudoMock into your Next.js application. You can use any template from SudoMock's mockup library as a starting point. These examples show how to use the smart object metadata in real frontend code.
SudoMock Client Utility
First, create a reusable client for making API calls to SudoMock:
1
React Hook for Managing Mockups
A custom hook that manages mockup state and provides useful computed values from the smart object metadata:
1
Live Preview with Canvas
Use the position data to create a real-time preview before rendering:
1
Server Action for Batch Rendering
Process multiple designs in parallel using Next.js Server Actions:
1
Environment Variables
Store your SudoMock API key in .env.local as SUDOMOCK_API_KEY.
Never expose it in client-side code - always call SudoMock from Server Components,
Server Actions, or API routes.
Key Takeaways
Related Resources
Frequently Asked Questions
Related Articles

SudoMock Now Works with Claude, Cursor, ChatGPT, and Any MCP-Compatible AI Tool
Render product mockups directly from any AI assistant that supports MCP. Claude, Cursor, VS Code, ChatGPT, Windsurf, and more.

API Integration Best Practices
Build robust API integrations. Implement parallel processing, retry logic, and error handling.
Explore by Use Case
See SudoMock in action for your specific product category
Ready to Try SudoMock?
Start automating your mockups with 500 free API credits.