Batch Replace Smart Objects in Photoshop: Script or API
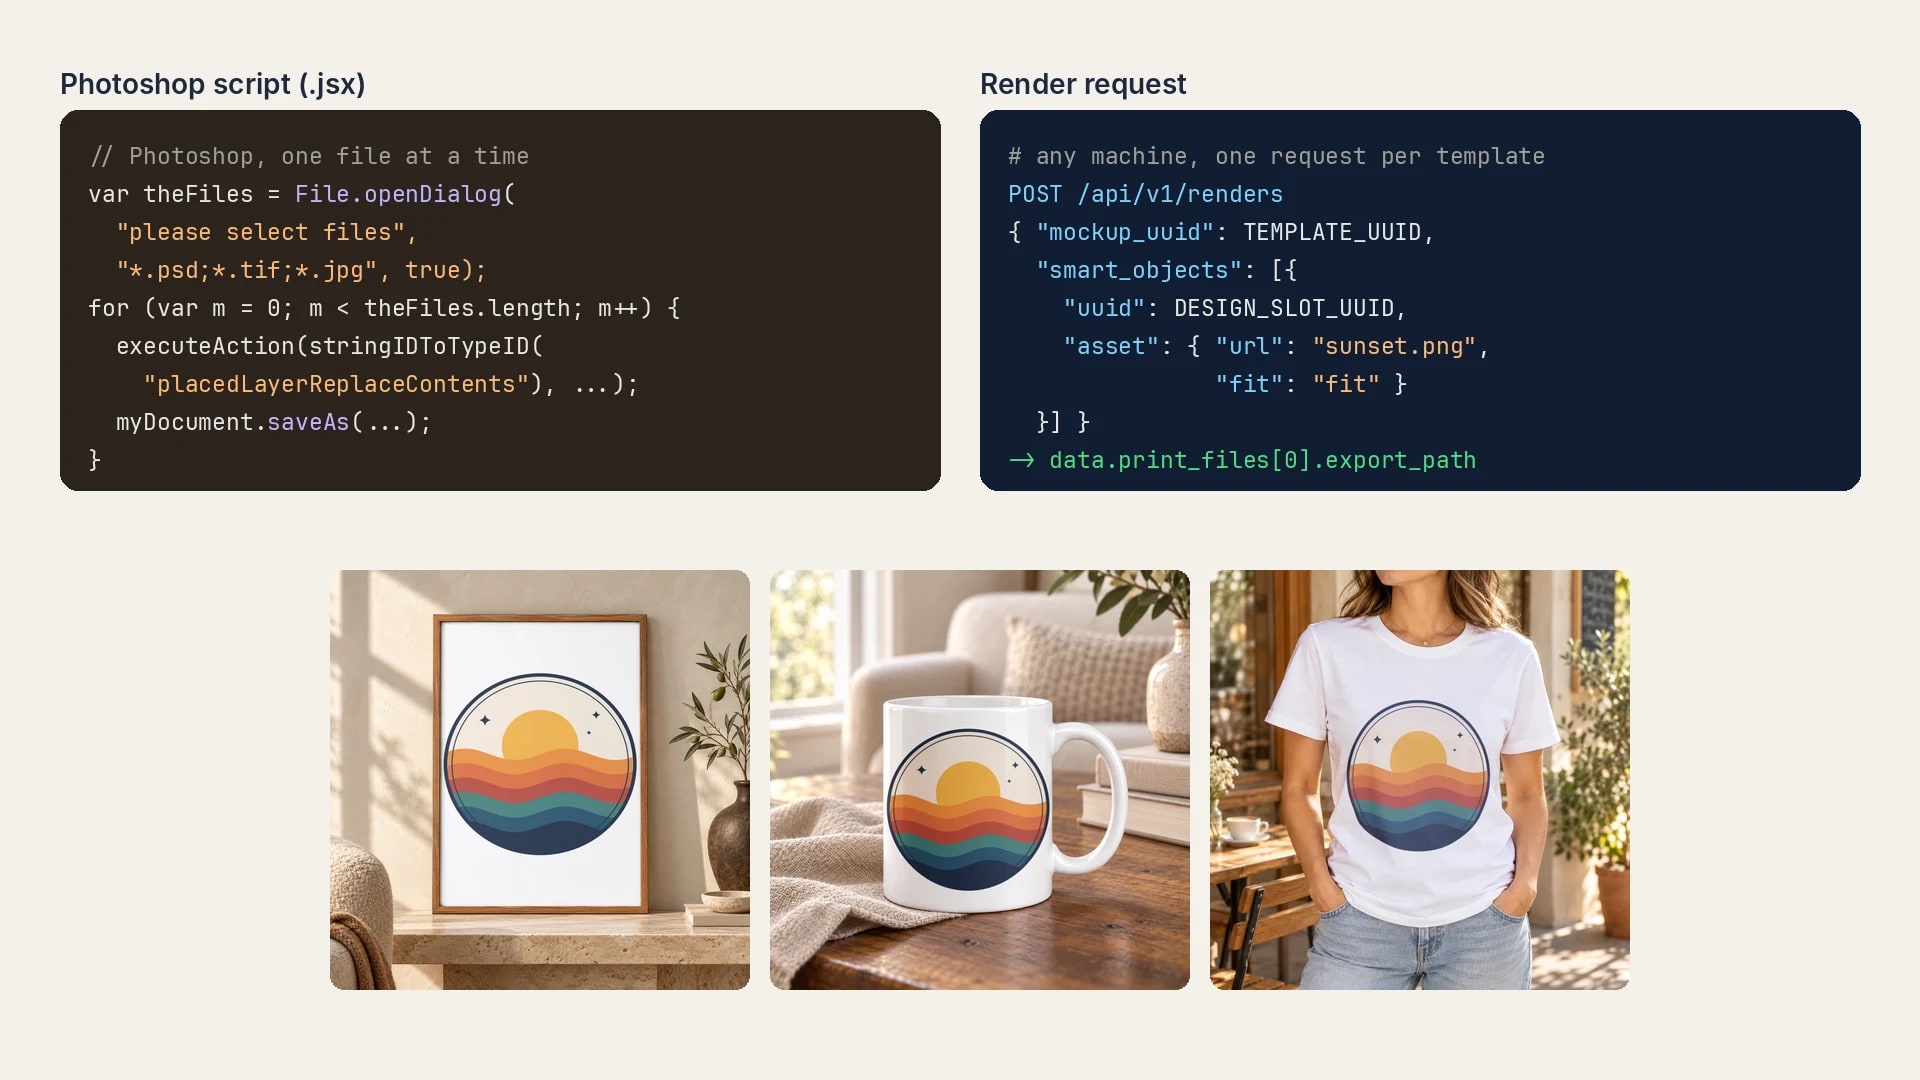
A Photoshop script batch replaces smart objects by selecting the smart object layer, running Replace Contents with each design file and saving a copy, with Photoshop open on that machine. By API it is one render request per design and per template, so one design fills a tee, a mug and a framed poster PSD in three requests.
Published 7 min readBeck
Key takeaways
- Adobe's current scripts are .psjs files on V8; most forum scripts are ES3 .jsx files.
- A flat PNG inside the smart object can make the script export the first design every time.
- A render loop has no file dialog and no Photoshop session, so it runs on a server or in n8n.
How a batch replace script fills a smart object
Every forum script for this job is built on one Action Manager call, placedLayerReplaceContents, which swaps the contents of the active layer for a file on disk. The rest is a file dialog, a loop and a save per file.
The Adobe community thread Batch replace smart objects (asked on 30 January 2014, 77 replies and 38,134 views when read on 4 November 2026) started with a designer who needed "over 40 book, CD, DVD, and Blu-Ray mockups for each flyer". The accepted answer from Community Expert c.pfaffenbichler replaces the contents with this Action Manager call:
// From the accepted answer in the Adobe community thread "Batch replace smart objects"function replaceContents (newFile, theSO) {app.activeDocument.activeLayer = theSO;var idplacedLayerReplaceContents = stringIDToTypeID( "placedLayerReplaceContents" );var desc3 = new ActionDescriptor();var idnull = charIDToTypeID( "null" );desc3.putPath( idnull, new File( newFile ) );var idPgNm = charIDToTypeID( "PgNm" );desc3.putInteger( idPgNm, 1 );executeAction( idplacedLayerReplaceContents, desc3, DialogModes.NO );return app.activeDocument.activeLayer};
Each result is saved next to the open PSD, named after the mockup and the design file.
ExtendScript or UXP: which script language
Most Photoshop scripts are JavaScript, in one of two forms. The forum scripts are ExtendScript files (.jsx), and Adobe's current platform runs UXP scripts (.psjs).
Adobe's UXP scripting page (read 4 November 2026) puts the difference this way: "ExtendScript uses a very old version of JavaScript (ES3), while UXP uses the V8 JavaScript engine which supports ES6." Its quickstart runs a .psjs file from "File Menu > Scripts > Browse" or by dropping it onto the Photoshop window, and a UXP script "cannot have a panel UI", only dialogs. Either way the script runs inside Photoshop, on the machine where Photoshop is open.
Five ways a batch replace script fails, and what the threads say
The threads record the same failures again and again, and most have a fix inside Photoshop.
| What you see | Where it is reported | What the thread says |
|---|---|---|
| The alert "selected layer is not a smart object" | The script itself checks theLayer.kind on the active layer | Select the smart object layer in the Layers panel, then run the script |
| PNG designs do not show in the file dialog | 2019 thread, JJMack, 22 January 2019: "The image file types can be PSD, Tif and Jpeg." | The script's file filter lists *.psd;*.tif;*.jpg: add *.png to it, or convert the designs |
| The first design is exported for every file | 2018 thread, about 100 PNGs into one frame mockup | JJMack: Save may switch to Save As "because the original was a flat png file". Add an empty layer inside the smart object, save it as a PSD and use Layer > Smart Object > Replace Contents with that PSD before the run |
| A long run times out and nothing comes out | Same thread, for "over 50k of mockups" of one canvas size | The asker: "the script seems to time out and nothing occurs at all", later narrowed to "~750 image files" (725 worked). JJMack ran 217 files without a problem and saw RAM use climb "from 4GB to 19GB" over an 876-file run |
| An error after a Photoshop update | Same thread, 17 August 2020 | A reader ran JJMack's scripts in Photoshop 2020 only after commenting out an @include line |
The same job without Photoshop: upload once, then one request per design
Upload the mockup PSD once and keep the template ID and the smart object ID from the response. Each design is then one render request, and the finished image comes back as a URL, so the loop runs on a server, in a scheduled job or in n8n with no Photoshop session.
curl -X POST https://api.sudomock.com/api/v1/psd/upload \-H "x-api-key: $SUDOMOCK_API_KEY" \-H "Content-Type: application/json" \-d '{"psd_file_url": "https://cdn.example.com/canvas-mockup.psd", "psd_name": "Canvas 16x20"}'
const response = await fetch('https://api.sudomock.com/api/v1/psd/upload', {method: 'POST',headers: {'x-api-key': process.env.SUDOMOCK_API_KEY,'Content-Type': 'application/json',},body: JSON.stringify({"psd_file_url": "https://cdn.example.com/canvas-mockup.psd","psd_name": "Canvas 16x20"}),});const data = await response.json();console.log(data);
import osimport requestsresponse = requests.post("https://api.sudomock.com/api/v1/psd/upload",headers={"x-api-key": os.environ["SUDOMOCK_API_KEY"],"Content-Type": "application/json",},json={"psd_file_url": "https://cdn.example.com/canvas-mockup.psd","psd_name": "Canvas 16x20",},)print(response.json())
package mainimport ("bytes""fmt""io""net/http""os")func main() {payload := []byte(`{"psd_file_url": "https://cdn.example.com/canvas-mockup.psd","psd_name": "Canvas 16x20"}`)req, err := http.NewRequest("POST", "https://api.sudomock.com/api/v1/psd/upload", bytes.NewBuffer(payload))if err != nil {panic(err)}req.Header.Set("x-api-key", os.Getenv("SUDOMOCK_API_KEY"))req.Header.Set("Content-Type", "application/json")resp, err := http.DefaultClient.Do(req)if err != nil {panic(err)}defer resp.Body.Close()body, _ := io.ReadAll(resp.Body)fmt.Println(string(body))}
<?php$payload = <<<'JSON'{"psd_file_url": "https://cdn.example.com/canvas-mockup.psd","psd_name": "Canvas 16x20"}JSON;$ch = curl_init('https://api.sudomock.com/api/v1/psd/upload');curl_setopt_array($ch, [CURLOPT_CUSTOMREQUEST => 'POST',CURLOPT_RETURNTRANSFER => true,CURLOPT_HTTPHEADER => ['x-api-key: ' . getenv('SUDOMOCK_API_KEY'),'Content-Type: application/json',],CURLOPT_POSTFIELDS => $payload,]);$response = curl_exec($ch);curl_close($ch);echo $response;
Keep data.uuid as the template and the uuid of the smart object that holds the design, listed in data.smart_objects (upload a PSD). The API fetches the file from psd_file_url, so use a link that downloads without a sign-in; the dashboard takes the PSD from your disk. In the dashboard, PSD uploads are capped at 300 MB. API uploads support files up to Adobe's official PSD file size limit.
curl -X POST https://api.sudomock.com/api/v1/renders \-H "x-api-key: $SUDOMOCK_API_KEY" \-H "Content-Type: application/json" \-d '{"mockup_uuid": "MOCKUP_UUID","smart_objects": [{"uuid": "SMART_OBJECT_UUID","asset": { "url": "https://cdn.example.com/designs/sunset-waves.png", "fit": "fit" }}],"export_options": { "image_format": "jpg", "image_size": 1024, "quality": 90 }}'
const response = await fetch('https://api.sudomock.com/api/v1/renders', {method: 'POST',headers: {'x-api-key': process.env.SUDOMOCK_API_KEY,'Content-Type': 'application/json',},body: JSON.stringify({"mockup_uuid": "MOCKUP_UUID","smart_objects": [{"uuid": "SMART_OBJECT_UUID","asset": {"url": "https://cdn.example.com/designs/sunset-waves.png","fit": "fit"}}],"export_options": {"image_format": "jpg","image_size": 1024,"quality": 90}}),});const data = await response.json();console.log(data);
import osimport requestsresponse = requests.post("https://api.sudomock.com/api/v1/renders",headers={"x-api-key": os.environ["SUDOMOCK_API_KEY"],"Content-Type": "application/json",},json={"mockup_uuid": "MOCKUP_UUID","smart_objects": [{"uuid": "SMART_OBJECT_UUID","asset": {"url": "https://cdn.example.com/designs/sunset-waves.png","fit": "fit",},},],"export_options": {"image_format": "jpg","image_size": 1024,"quality": 90,},},)print(response.json())
package mainimport ("bytes""fmt""io""net/http""os")func main() {payload := []byte(`{"mockup_uuid": "MOCKUP_UUID","smart_objects": [{"uuid": "SMART_OBJECT_UUID","asset": {"url": "https://cdn.example.com/designs/sunset-waves.png","fit": "fit"}}],"export_options": {"image_format": "jpg","image_size": 1024,"quality": 90}}`)req, err := http.NewRequest("POST", "https://api.sudomock.com/api/v1/renders", bytes.NewBuffer(payload))if err != nil {panic(err)}req.Header.Set("x-api-key", os.Getenv("SUDOMOCK_API_KEY"))req.Header.Set("Content-Type", "application/json")resp, err := http.DefaultClient.Do(req)if err != nil {panic(err)}defer resp.Body.Close()body, _ := io.ReadAll(resp.Body)fmt.Println(string(body))}
<?php$payload = <<<'JSON'{"mockup_uuid": "MOCKUP_UUID","smart_objects": [{"uuid": "SMART_OBJECT_UUID","asset": {"url": "https://cdn.example.com/designs/sunset-waves.png","fit": "fit"}}],"export_options": {"image_format": "jpg","image_size": 1024,"quality": 90}}JSON;$ch = curl_init('https://api.sudomock.com/api/v1/renders');curl_setopt_array($ch, [CURLOPT_CUSTOMREQUEST => 'POST',CURLOPT_RETURNTRANSFER => true,CURLOPT_HTTPHEADER => ['x-api-key: ' . getenv('SUDOMOCK_API_KEY'),'Content-Type: application/json',],CURLOPT_POSTFIELDS => $payload,]);$response = curl_exec($ch);curl_close($ch);echo $response;
The finished file is at data.print_files[0].export_path. Save it under the design's own file name, the naming the forum scripts use. Each step of the script has a field:
| Script step | Render request |
|---|---|
| Open the mockup PSD | mockup_uuid, from the upload |
| Select the smart object layer | smart_objects[].uuid |
| Replace Contents with a file | asset.url, or asset.base64 with content_type for a file on disk |
| Resize the design to fit the smart object | asset.fit: fit keeps the whole design, crop covers the area, fill stretches |
| Save a copy as JPG or PSD | export_options: png, jpg or webp, and image_size |
| Next file in the folder | The next request |
The smart object keeps the transforms, warps, blend modes and effects the PSD gives it, as render a PSD without Photoshop lists, and SudoMock renders match Photoshop's own output. There is no file dialog in the loop, and a design in PNG, JPEG, WebP or GIF goes in as it is.
One design into every mockup PSD
To put one design into many templates, loop over the templates instead of the designs. The design URL stays the same, and each request carries another template's mockup_uuid and its smart object uuid.
On 4 November 2026 one design, a 2048 px square sunset with a transparent background, went to three templates with fit set to fit: a t-shirt, a mug and a framed poster. Three requests returned three finished mockups, each with the whole design inside its print area.
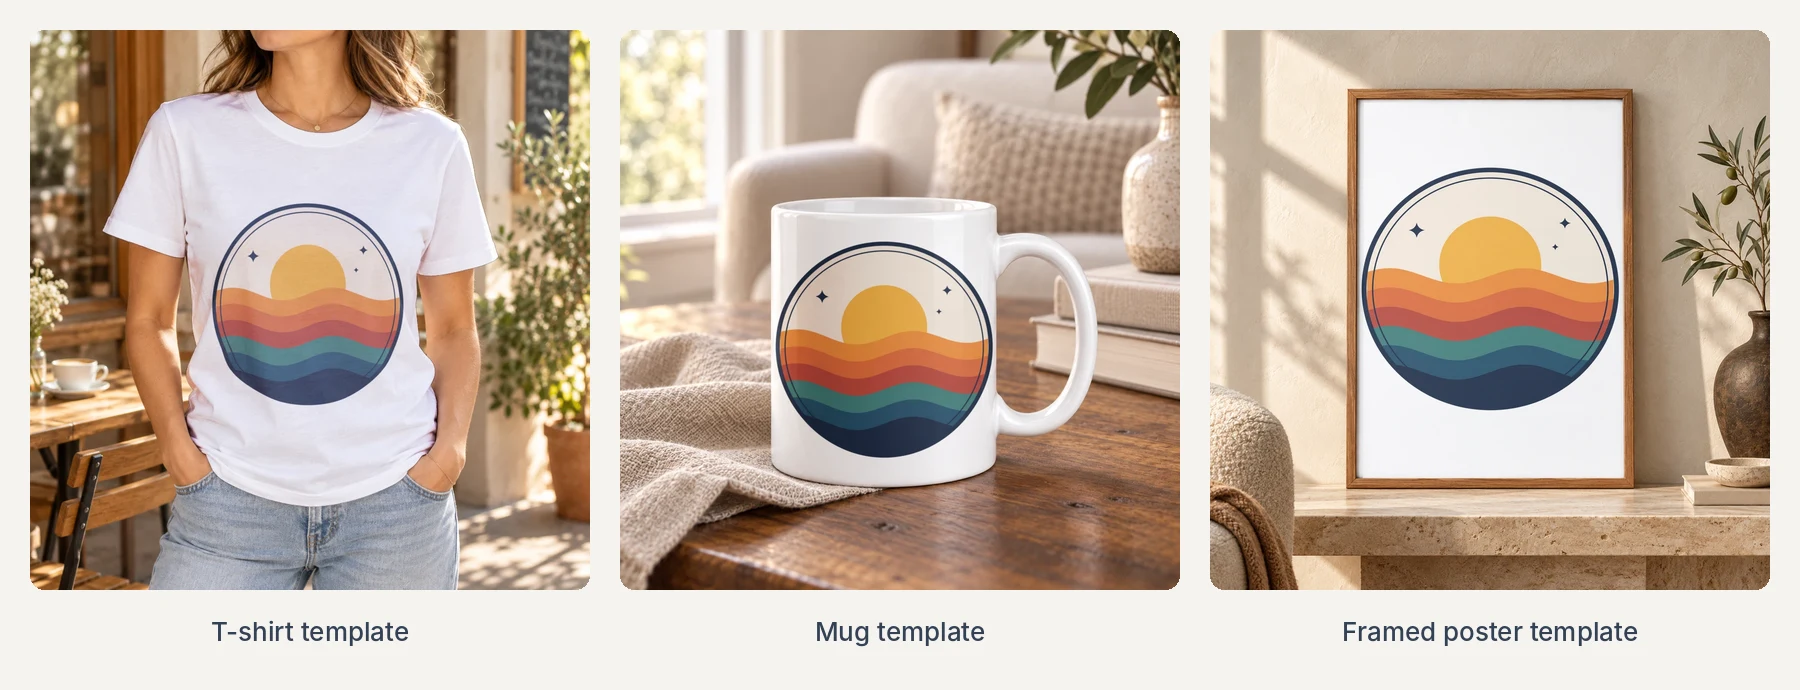 One design, three templates: the same asset URL with each template's own smart object ID, fit set to fit, rendered on 4 November 2026.
The three print areas have different shapes, and fit keeps a square design whole in each of them, where crop would cut it to the area (fit and blend modes). Without templates of your own, the API-ready crewneck t-shirt templates, mug templates and framed print templates take the same request.
A PSD with several smart objects is one request too: list one entry per smart object uuid, and any you leave out renders as the designer built it (smart objects). A smart object placed inside another is listed inside its parent's entry in the upload response.
Running a long list
A long list runs as many requests at once. The average SudoMock render finishes in under a second; we measure render time in milliseconds.
Requests run in parallel up to your plan's concurrency, and a request past it comes back as 429 with a Retry-After header to wait out (usage limits). For a run you start and leave, send is_async: true and take each result from a webhook.
Next step
Upload one mockup PSD, render three designs into it, then add a second template to the same loop. The render reference lists every field above, and the Python integration carries the same request in a script. Without code, the PSD Mockup: Render operation of the SudoMock n8n node takes the same template, smart object and design URL.
If your designs come with titles or captions in a spreadsheet, Photoshop Variables and Data Sets by API maps each CSV row to one request. For catalog-size runs, the bulk rendering use case shows the same loop across products.
Frequently asked questions
Do I need Photoshop open to batch replace smart objects?
A Photoshop script runs inside Photoshop, so Photoshop stays open on that machine for the whole run. A render request needs no Photoshop session: the PSD is uploaded once and each design is sent by HTTP from any machine, server or workflow tool.
What language are Photoshop scripts written in?
Most Photoshop scripts are JavaScript, and Adobe's scripting guide also lists AppleScript on Mac and VBScript on Windows. Older scripts, including most forum scripts for batch replacing smart objects, are ExtendScript files with the .jsx extension, written for ES3. Adobe's current UXP scripts use the .psjs extension and run modern JavaScript on the V8 engine.
How do I replace several smart objects in one PSD at once?
In a render request, list one entry per smart object, each with its own uuid from the upload response and its own design. Smart objects you leave out render as the designer built them. One request returns the finished mockup with every listed smart object filled.
Why does my batch replace script export the same design every time?
A reply on the Adobe community traces it to a smart object whose contents are a flat PNG, which can turn Save into Save As. The suggested fix is to open the smart object, add an empty layer, save it as a PSD and replace the contents with that PSD once before running the script again.
Is there a file size limit for the mockup PSD?
In the SudoMock dashboard, PSD uploads are capped at 300 MB. API uploads support files up to Adobe's official PSD file size limit.
Sources
- Batch replace smart objects (opens in new tab), Adobe Community
- Batch replace smart objects v2 (opens in new tab), Adobe Community
- Photoshop Script for Multiple Mockups (opens in new tab), Adobe Community
- UXP Scripting (opens in new tab), Adobe Developer
- Quickstart Guide (opens in new tab), Adobe Developer
- Render a PSD without Photoshop (opens in new tab)
- Upload a PSD (opens in new tab)
- Fit and blend modes (opens in new tab)
- Photoshop CC Scripting Guide (opens in new tab), Adobe
Beck
CTO
Related articles
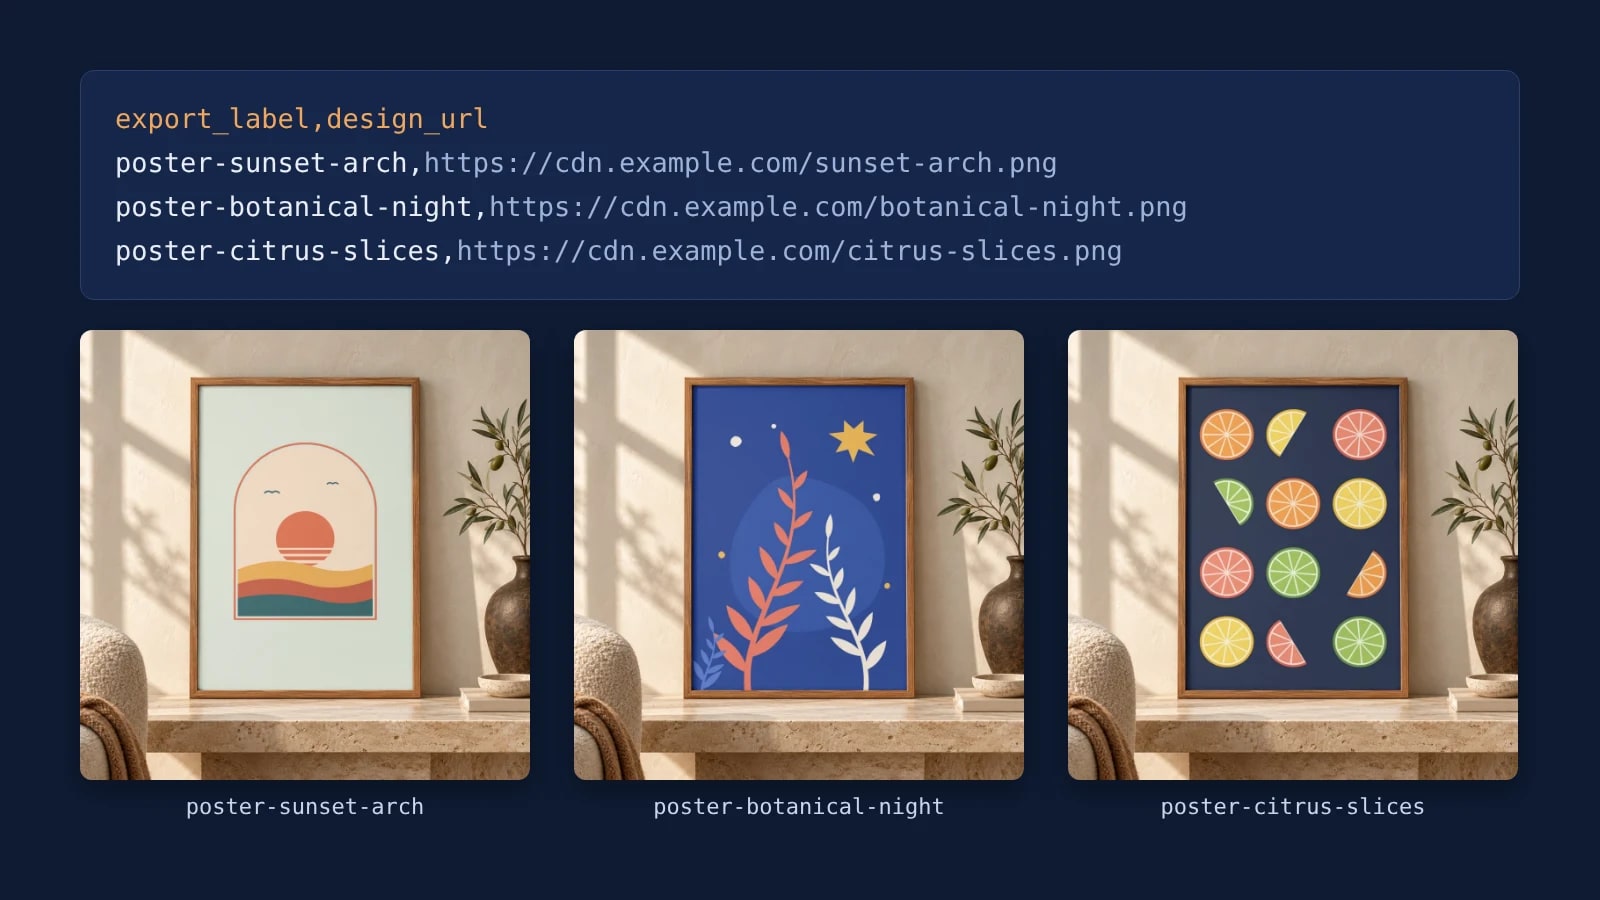
Photoshop Variables and Data Sets for Mockups, Run by API
Map Photoshop's Text Replacement, Pixel Replacement and Visibility variables to render fields and run every CSV row against your mockup PSD.
8 min read
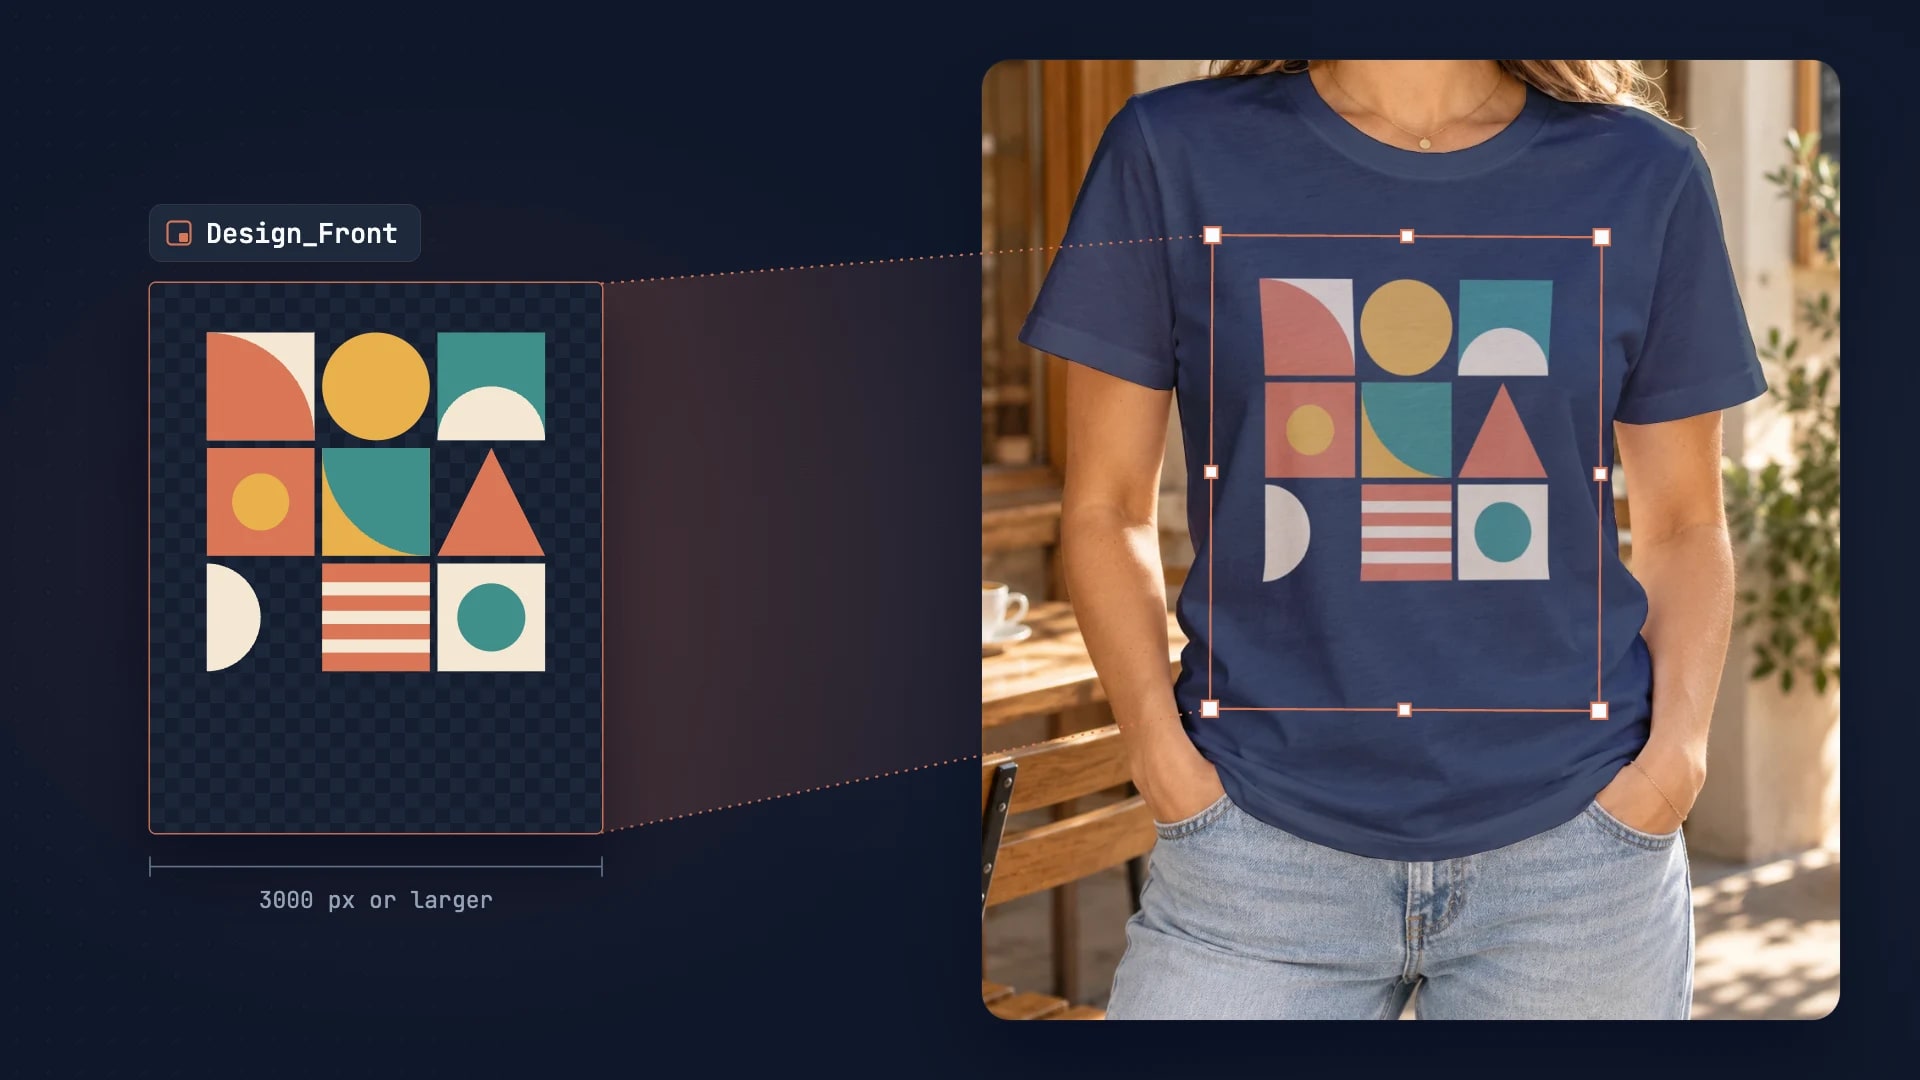
PSD Mockup Template Guide: Best Practices for Automation
Learn how to create API-ready PSD mockup templates. Complete guide covering dimensions, Smart Object setup, layer naming, blend modes, and optimization for automation.
7 min read
PSD Mockup API vs Photoshop Actions: Complete Guide
When to use a mockup API vs Photoshop actions. Pros, cons, and use cases for each approach.
2 min read
Explore by use case
See SudoMock in action for your specific product category
Your own PSD, rendered via API
Render your own PSD through the API. Start with 500 one-time credits, no card.